Showing posts with label support. Show all posts

Sunday, June 30, 2013

Tomato Plant Mistakes Made 2013


20 April 2013 I put four commercially started tomato plants into the new raised bed #2. Boy, they looked good and I took credit.

The bed has 16-1' x 1' squares in a 4' x 4' frame. I numbered the 1' square starting with #1 in the lower left and continued numbering them moving to the right through #4. Numbers 5 through 8 in the second row, so on and so forth until the last square in the top right corner is numbered 16.

Planted in position #9 was a Beefsteak, which I purchased at my wife's request. In position #10 was Mr. Stripey, whose taste is rather buttery. In position #11 a Mortgage Lifter, a prolific producer.  A Tami G grape tomato finished out the third row at position #12, a variety I had never heard of until this year. 


At that time there were no supports in place. No trellises, cages or even stakes. Over the next month the plants gained in size. Without stakes or support the tomato plants bent over from their own weight and were touching the ground. 


By the time the new trellises were made and installed along with the trellises made last year, the stems of the tomato plants were rigid. Rigid and bent. I was worried the stems might break if I tried to straighten them and tie them to the trellis. Starting down low, I tied the stems loosely. Hoping I would be able to change the shape of the stems slowly, over the course of days if not weeks. That I would be able to get the tomatoes upright, off the ground and tied vertically to the trellises.

Unfortunately, I was impatient that day. I lacked finesse. I pushed the stem of the Beefsteak tomato too far. The stem broke. Not completely severed. Just cracked, half way through. At the time I thought, "You dumb #*∞§!"

My mind went into first aid mode. I triaged the situation. I looked at the materials and tools at hand. I was going to save this beefsteak or else.

What did I have on hand? I had 1"-2"/25mm-50mm wide strips of knitted bed sheet rolled into a ball, like a knitter rolls yarn. I expected to use the strips to tie the vines to the trellises as they grew during growing season. These bed sheet strips resembled bandages. You know, the kind women boiled and rolled back in the old days. Seemed perfectly clear what to do.

Cut my wrists.

No! I wasn't going to take the easy way out.


I fashioned a face mask out of my red bandana and prepared to begin the operation. I wrapped the damaged stem with a long strip of bed sheet. I figured that would pull the stem together to keep out insects but allow some flexibility in the stem. With the stem closed, I hoped it would somehow heal itself, the sap would continue to flow and keep the plant alive. I wound the bandage snuggly around the stem. Then I tied it to the trellis.

I removed my face mask and stepped back to evaluate the situation. The wound was closed and the vine was off the ground. Only time would tell if the operation was a success.

With my face mask down around my neck I continued to survey the remaining tomato plants. That is when I saw the Beefsteak wasn't the only tomato damage I inflicted.


Trying to keep the plants healthy and as productive as possible, soon after transplanting I began pinching suckers from the tomato plants. Suckers are branches that grow from the crotch where a side branch connects to the leader stem. Many people believe the suckers take energy from the main portion of the plant and are not necessary. It seems I was a bit too aggressive pinching the suckers from Mr. Stripey. It wasn't the sucker I pinched off at all. I mistakenly pinched off the leader stem. Once that was done the plant stopped growing, all together. It looked really sad. All the leaves were curled and discolored. A sad looking plant.

There were some flowers below the point where the leader was pinched. Those flowers went on to set fruit. Those tomatoes continued to grow in size. I had no idea where they got the energy to grow with the leaves in such bad shape. I hoped some new growth would emerge below that pinch site. New growth that would take over for that missing leader stem.

Of the four tomato plants transplanted on 20 April, 2013 neither Beefsteak nor Mr. Stripey look good. I take full responsibility. It is all my fault. You dumb #*∞§!

©Damyon T. Verbo - all rights reserved


Tuesday, July 24, 2012

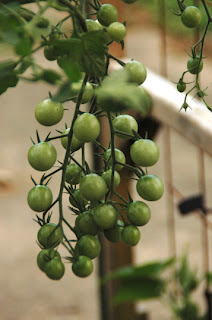
Grape Tomatoes 23 July 2012

I haven't spent much time in the garden because of the heat. Fifteen of the twenty-three days in July have been over 90ºF/32ºC. I worked outdoors for 34 years and I really don't want to go into the hot sun anymore than need be.

weather underground
I watered when needed but I haven't done much more than that.


I have been harvesting. Lettuce is all gone, several varieties of tomatoes, one cayenne pepper and two potatoes.


All the tomatoes are delicious. The cayenne wasn't as hot I it might be, but it was green. It had fallen off the plant when I took up the soaking hose and put down a new piece. The old hose sprung several holes which gushed water and the plot was not evenly watered because of it. The lettuce was great and the potatoes super.


To get the potatoes I just reached into the tower where a potato stem was growing, dug around until I felt a spud and brought it out. The potatoes were small, one the size of a golf ball.


Super Sweet

There are three grape/cherry tomato varieties, Chocolate Cherry, Husky Cherry and Super Sweet. So far, of the three I like Super Sweet the best. The skin on the Husky is too thick as was the skin on the Chocolate Cherry. They were the first of the season and I will give you my overall favorite at the end of the season.

The Super Sweet vine has really taken off and I had to tie it to the remesh I attached to the square foot plot support for the cucumbers and watermelon. It has grown quite long.


I hope the heat goes down below 90ºF for the remainder of the season. I really can't take the heat.


©Damyon T. Verbo - all rights reserved


Monday, May 28, 2012

First Snow Pea Harvest

I picked some snow peas today. 


I love them when they are small, crisp, tender and sweet. Unlike the limp, tasteless monsters you get at the supermarket.


I didn't get many, 2oz/57g. They will be a welcome addition to a green salad.


Snow Pea Timeline


Seeds planted into the garden on 4 April


Snow pea plants 2"/50mm tall on 2 May


Snow pea plants 6"/152mm on 16 May


Snow peas 12"/305mm tall and flowering on 20 May

First harvest of snow peas 27 May


©Damyon T. Verbo - all rights reserved


Monday, May 21, 2012

Snow Peas Blooming

The snow peas began blooming on 19May. The plants have reached the top of the wire supports, which is 12"/30cm from the soil surface.

Images captured 20May2012


©Damyon T. Verbo - all rights reserved


Saturday, May 19, 2012

Snow Peas Update

I planned to get the Snow Pea seeds into the ground on St. Patrick's Day, 17March, but that didn't happen. I planted the snow pea seeds 4April. Here is a review and update on the peas.


Snow Pea seeds ready for plastic sandwich bag 18March2012
4April2012

2May2012

14May2012
14May2012
The Snow Peas have grown to about 9"/23cm in 6 weeks. I do not see any flower buds. I expect harvest will be in June.


Even before the harvest I will be planting melon seeds in two squares and cucumber seeds in the other two squares in the back of the plot. That will probably happen very close to 1June.


©Damyon T. Verbo - all rights reserved


Sunday, May 13, 2012

Make Wire Supports For Your Garden

There are times when plants in your garden will need support. This post will show you how to make wire plant supports from readily available wire fencing.

The snow peas in my plot will soon need support. These supports were made for snow peas and can be used for other plants. The idea is that the plant will grew through the top of the support. The wire cube will provide the needed support.


There remained a piece of wire fencing from the no dig potato cage blogged about earlier. The rectangles in the fencing measure 2"(50mm) x 3"(76mm). The roll of fencing is 36"(91cm) wide.


Cut the fencing from one end so that there is 12"(38cm) of closed rectangles by the width of the roll, 36"(91cm).


Cut the wire midway into the next rectangle.


There will be 2"(50mm) of extra wire on each side.


Cut as many 3'(91cm) x 1'(38cm) pieces as supports needed.


A 12"(38cm) length of wood is needed to fold the wire sides. 


Source:onlinetoolsupply.com 
Use the wood block as a metal brake is used to bend sheet metal.


Bend both sides of the support that there are three sides of a cube measuring 12"(38cm) on each side.

Next, place the supports over each square planted with peas.

I turned the supports that I may easily reach in them from one side of the plot. With all the Norway Maples in my yard I need to clear out maple seeds constantly. Weeding will be possible, too.
 This corner support I turned 90º because it felt right.


I will update when the peas grow above the wire supports.


©Damyon T. Verbo - all rights reserved