Showing posts with label Tower. Show all posts

Sunday, May 19, 2013

Lazy Bed Potato Planting Method


Last year I grew potatoes in towers. The towers were constructed of wire fencing material rolled into columns. Each tower was lined with fabric and rebar was driven into the ground close to each tower for support.


6"/15cm of shredded leaves from the previous autumn were alternately layered in each tower with a layer of seed potatoes.


A 12"/30cm layer of growing medium was placed atop each tower into which was planted a grape/patio tomato. This proved to be a mistake. I was unable to harvest the potatoes when they were ready for harvest because the tomatoes were still producing.


Although, for the season, the grape tomatoes were productive(13.2 lbs/6.448k), I was disappointed with the potato production (2.11 lbs/1.031k).


This year I planted a few potatoes from the towers harvest of last year, combined with some sprouting potatoes from a bag of commercially grown potatoes found in my pantry. However, I used a different planting method.


I had a supply of sod I cut during the process of preparing the second raised bed site. This reminded me of a method of potato planting told to me by an Irishman who was raised in the Wicklow mountains outside Dublin, the Lazy Bed.

Basically, to make the lazy bed, potatoes are placed on the ground atop the grass. The sod next to the potatoes is dug up and flipped over onto the potatoes. Easy right? Sounded easy to me. Plus, I already had sod cut.


I chose a site close to my second raised bed. I decided to use the same footprint of my raised bed, 4'/1.21m square, for the lazy bed.


I placed four potatoes in a row, each 12"/30cm from each other. I also placed a drip irrigation tube in each row. The drippers are conveniently spaced 12"/30cm apart which made the potato spacing easy.

The previously cut sod was then placed atop the rows of potatoes.


The overturned sod was then covered with 4"/ 10cm of shredded leaves. The mulch of shredded leaves will retain moisture, provide food and allow ease of weeding. Plus I had to move the pile of leaves off my patio.

I hope the production of potatoes will increase with this method. Time will tell.

©Damyon T. Verbo - all rights reserved


Sunday, October 7, 2012

Potato Towers Harvested

2012 was the first time I planted potatoes in towers. I used shredded leaves from last autumn as the medium and planted patio style tomatoes on top of each tower.


Several kinds of potatoes were planted. Three kinds produced spuds - Yukon Gold, Russet and Red Norland.


The tomatoes produced massive amounts of both Husky Cherry and Super Sweet 100 tomatoes. The day I cut down all the plants in the garden, both of these patio tomatoes were still producing fruit. However, the potatoes that were growing under the tomatoes should probably have been harvested earlier. As a matter of fact the potatoes really didn't produce as much leafy greens as they should. There were only a few greens growing out of the tower and those that grew were sparse and short lived. The potato plants were long dead before I cleared the tomatoes and opened the towers.
The towers were opened by straightening the short ends of wire left on each end of the wire fencing the formed each tower. One by one the wires were opened until the fencing could be pulled back. The fabric was opened and the digging for spuds began.

While digging through the shredded leaves, I came in contact with three kinds insects. The first and most aggressive was ants. Ant nests were distributed throughout the medium. In those ant nests were angry ants! They climbed from my hands to my forearms, biting along the way. They entered my shoes, climbed my ankles biting on their way up my pant legs. I had to step back and wipe the ants from my limbs. This took some time, for no sooner did they appear to be off my limbs more appeared, still biting.

Another lovely find in the media were sow bugs. The presence of sow bugs is what makes me think I should have harvested the potatoes earlier. The sow bugs were eating the spuds. Not a great deal of damage but damage none the less.


The last insect I encountered were cicada larvae. Big ugly cicada larvae. Down at the very bottom of each tower between all the weight of the media, potatoes and tomatoes in each tower were some 20 larvae. I placed them on the patio surface for the birds to feast upon. They dried in the sun without any interest from the birds.

Lets get down to the important facts about the potato towers.


The potatoes were small,


the potatoes were few. 


The total weight of all potatoes grown was 1031g/ 2.27lbs.

If I grow potatoes in towers next year there will be changes. Changes such as no tomatoes planted on top of the tower, a way to ensure water is delivered to the whole tower, possibly a different planting media and definitely space between the towers to allow the plant leaves to get more sun which I hope will produce larger spuds.

To the drawing board.

©Damyon T. Verbo - all rights reserved


Tuesday, July 24, 2012

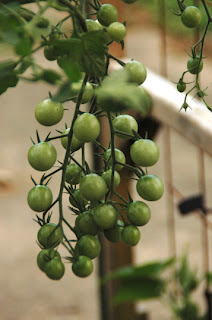
Grape Tomatoes 23 July 2012

I haven't spent much time in the garden because of the heat. Fifteen of the twenty-three days in July have been over 90ºF/32ºC. I worked outdoors for 34 years and I really don't want to go into the hot sun anymore than need be.

weather underground
I watered when needed but I haven't done much more than that.


I have been harvesting. Lettuce is all gone, several varieties of tomatoes, one cayenne pepper and two potatoes.


All the tomatoes are delicious. The cayenne wasn't as hot I it might be, but it was green. It had fallen off the plant when I took up the soaking hose and put down a new piece. The old hose sprung several holes which gushed water and the plot was not evenly watered because of it. The lettuce was great and the potatoes super.


To get the potatoes I just reached into the tower where a potato stem was growing, dug around until I felt a spud and brought it out. The potatoes were small, one the size of a golf ball.


Super Sweet

There are three grape/cherry tomato varieties, Chocolate Cherry, Husky Cherry and Super Sweet. So far, of the three I like Super Sweet the best. The skin on the Husky is too thick as was the skin on the Chocolate Cherry. They were the first of the season and I will give you my overall favorite at the end of the season.

The Super Sweet vine has really taken off and I had to tie it to the remesh I attached to the square foot plot support for the cucumbers and watermelon. It has grown quite long.


I hope the heat goes down below 90ºF for the remainder of the season. I really can't take the heat.


©Damyon T. Verbo - all rights reserved


Tuesday, May 22, 2012

Transplanting Tomato Plants Into The Garden

Let's face it, starting seeds indoors is not an easy project. Although I have done it in the past, I didn't have the time this year or for the last five years, for that matter. So I, and a large majority of gardeners, will purchase plants to transplant into their gardens. This post will deal with transplanting tomatoes.


Here are two tomato plants I purchased at Lowe's on sale in late April at 2/$3.00. They are Bonnie Plants brand. These are both cherry/grape size tomatoes that I am planting in the top of my two potato towers. 

To reiterate, I filled the potato towers with shredded autumn leaves that spent the winter atop my square foot garden plot. In early March I started to compost kitchen wasted into the pile of leaves. The leaves were partially composted when I added them to my square foot plot. The leaves that weren't used in the plot were placed directly into two towers made from wire fence material with cloth lining the towers to contain the leaves and potato plants. I also drove 1/2"/12mm lengths of rebar into the ground to stabilize the towers. The towers were planted with potato seeds in layers  6"/ 15cm apart with the last layer 12"/30cm thick atop the last layer of potatoes. That last 12"/30cm will be where the cherry/grape tomatoes will grow.

Here is the top of the first tower I constructed. I created a well in the center of the shredded leaves and filled the well with some soil mix from last years hanging pots.

Remove all the last years plant remains and brake up any clumps of soil mix before placing the mix into the top of the tower.
Create a new well in the soil mix in which to place the tomato plant. One plant per tower.


Take a tomato plant in hand and remove it from its pot. The Bonnie Plants are in peat pots with a plastic label around the top. I cut off the label and removed the peat pot.

Bonnie Plants advertises the peat pots will decompose and are therefore more ecologically sound. Maybe so, however, the roots were pot-bound, as you can see in the above photograph. Leaving the roots in this condition will keep the roots growing in a circular pattern. That won't be good for the plant. That is why I remove the peat pots.


The roots need to be either unwound or if they are so intertwined, cut. New roots will grow once the plant is in its new soil.


Next I pinch off most of the lower branches of the plant. The reason is to place the plant deeper into the soil. Sunlight and air movement (read breeze here) will dry out the soil surface. Planting deeper allows the roots to keep moist because they are not near the surface of the soil that is likely to vary in moisture content.

Tomato plants are special when it comes to roots. All those hairy looking fibers growing straight out from the stem will become roots. The deeply planted stem will grow more roots from those hairy looking fibers allowing the plant to take in more moisture and with it, nutrients. Nutrients are good for plants as well as people.


By pinching off the lower stems I will plant the tomato at least 2"/50mm deeper.


Once the tomato is where you want it, fill in the depression with more planting mixture. Then it is important to water each and every transplant. Make sure the soil is moist through and through by burrowing down with your finger.

Clean up, for you are finished. Water each plant 1gal/3.78l per week, keep the weeds pulled and wait for those delicious tomatoes to turn red or yellow or striped or black ...

©Damyon T. Verbo - all rights reserved


Tuesday, May 15, 2012

Built Another Potato Tower

Quite a bit of leaves remained after adding them to my square foot plot and filling up my potato tower.  I decided I like potatoes and another tower was in order.  I purchased a 50'/15m roll of 3'/.9m wide fencing. The fencing has 3"/76mm x 2"/50mm rectangular openings, as did the previous fencing used to build the first tower. This fencing differs in a few ways. The wire is a smaller gauge. It almosts feels soft, much easier to bend. The long side of the 2" x 3" openings changed orientation 90º so that the 3"/76mm dimension went from horizontal to vertical. 


I am guessing the gauge of the wire decreased to keep the price of the fencing low. I have no idea why the orientation rotated 90º. In any event, I constructed another tower using the same 64"/1.6m length of fencing. I cut the extra rectangle in order to attach both ends of the fencing to each other. I cut another wire coat hanger and made 5"/127mm staples to pin down the towers to the soil.


I changed the cloth used to surround the tower. I used all the remaining landscaping fabric on the first tower. I scrounged in my garage for something to use. I found a black single bed sheet in my rag pile. Bed sheets are saved to be reused before selling to the rag shop or entering the trash stream. (I am the son of parents that lived through the Great Depression. We save rags, aluminum, copper, screws, nails and lumber of sizable usable lengths. Our family has been recycling our whole lives. We are no strangers to the rag/scrap shop.)


I draped the sheet around the tower and overlapped where the ends of the fencing were joined. One edge of the sheet touched the ground and the remaining cloth flows over the top of the tower. I then placed 6"/15cm of leaves in the bottom of the tower. I didn't have any store bought potato seeds, so I opened my pantry to  scrounge for a suitable replacement.


I found a few sprouted Russet potatoes that were living under a large sweet white onion. They was easy to spot. The sprouts were a sickly white 6"/15cm and reaching around the Oso Sweet onion from both sides as though hugging the Oso in a lyonnaised sort of way, straining towards what little light entered the pantry.


I took the sprouting potatoes to the tower. This time instead of cutting the wire at the 6" level, I cut the sheet and bent the wire of one rectangle and squeezed in on potato leaving the 6" sprouts out in the sunlight. I did this again for the other potatoes. I expected to return to Lowe's to purchase more All Blue and Yukon Gold potato seeds to fill the rest of the tower. (I later discovered at Lowe's that the blue were dried and smelled bad and no gold remained. I purchased a bag of Russets.) The potatoes were planted Mon., May14.


©Damyon T. Verbo - all rights reserved