Showing posts with label wire. Show all posts

Monday, July 2, 2012

Using Remesh for a Trellis

The week of June 26th, the full sized indeterminate tomatoes, planted in the square foot garden plot, were of a size that demanded support. The weight of the fruit pulled the vine down to its natural growing position on the ground. Because the small surface area of square foot garden, vining plants must be grown vertically.

A second trellis was always in the garden plan. As with the first trellis, recycled materials were planned to be utilized. However, suitable recyclable material with which to construct the trellis was not forthcoming. That material just never materialized. The tomato plants were beginning to spread along the soil surface. A trellis was needed immediately.

 42" x 84" Mesh Sheet

A piece of remesh was purchased to make the second trellis. Remesh is concrete reinforcing wire mesh with 6"/15cm spacings. That spacing allows a hand to pass through in order to pick ripe fruit. Any spacing smaller than 6"/15cm is not recommended.

Photographed in late April
Earlier in the spring, two wooden frames were constructed using 2"x2" (50mm x 50mm) lumber and some plywood gussets. Only one of those frames received a wire grid as you can see in the above photograph. The grid was saved from the trash at Lowe's, zero cost to me. The time had arrived to add wire to the second frame. Wire that needed to be purchased.


To start the project both wooden frames were removed from the plot. Each was supported by two 6'/1.2m lengths of 1/2"/13mm concrete reinforcing bars driven several feet into the ground. Each leg of the frames was tied in two places to the rebar using rebar tie wire. The first wire several inches above ground level and the other wire a few inches below the top of the rebar.

The frame with the Lowe's rug grid was moved to the center dissecting the plot north to south. The two rebars supporting the frame were pulled from the earth and again driven several feet into the earth at the center of the plot. Rebar tie wire was again used to secure the frame to the rebars.


The second frame was placed flat onto the patio concrete. The remesh was laid upon the frame with the bottom of the remesh about 6"/15cm above the bottom ends of the frame legs. The 6"/15cm allowed for some room for uneven soil. The cucumber and melon vines will be able to span that 6"/15cm between the soil and the remesh.


Three screws were inserted into the middle of the 2"/50mm width of the bottom wooden cross brace of the frame. The spacing wasn't critical. Eyeballing the center, left to right, a screw was driven into the wood leaving enough screw exposed to allow the wire between the head of the screw and the wood. Two additional screws were inserted into the wood, as above, 12"/30cm out from the center screw in each direction. Repeat the same on the top wooden cross brace. These six screws will support the weight of the remesh and the weight of the vines and fruit.


Two correct sized fender washers are encircled. Also in the photograph are the screw , small washer and larger  holed fender washers.

To keep the remesh in that position required several more screws, each with an a fender washer. Fender washers have small center holes compared to the overall width of the washer. Four fender washers were found a pile of saved hardware in the garage. However, only two of the four fender washers were the correct size. The holes in the other two were larger than the head of the screws. The larger holes would allow the head of the screws to pass though. Something had to be done in order to use the larger fender washers.


In the same pile of unused hardware were found small washers that would not allow the heads of the screws through but were too small to hold the remesh on the frame. These smaller washers were first placed on the screws followed by the larger holed fender washers. Then the four screws and with fender washers were driven into the wood above the wire to hold the remesh onto the frame. 


Explanation of the above photograph to follow.


Once the remesh was attached the frame was wired to the rebar as described above. Two trellises were now in place in the square foot garden plot, ready to support tomatoes, cucumber and melon vines. 


©Damyon T. Verbo - all rights reserved


Monday, May 21, 2012

Snow Peas Blooming

The snow peas began blooming on 19May. The plants have reached the top of the wire supports, which is 12"/30cm from the soil surface.

Images captured 20May2012


©Damyon T. Verbo - all rights reserved


Saturday, May 19, 2012

Snow Peas Update

I planned to get the Snow Pea seeds into the ground on St. Patrick's Day, 17March, but that didn't happen. I planted the snow pea seeds 4April. Here is a review and update on the peas.


Snow Pea seeds ready for plastic sandwich bag 18March2012
4April2012

2May2012

14May2012
14May2012
The Snow Peas have grown to about 9"/23cm in 6 weeks. I do not see any flower buds. I expect harvest will be in June.


Even before the harvest I will be planting melon seeds in two squares and cucumber seeds in the other two squares in the back of the plot. That will probably happen very close to 1June.


©Damyon T. Verbo - all rights reserved


Sunday, April 22, 2012

Prepping Potato Tower Plot


I decided to place the potato tower next to my square foot garden.  I have been thinking of expanding my square foot plot. This work will be the first step towards the new plot preparation.

I measuring off a 4' (1.2m) x 4'(1.2m) area next to my original plot. Right away I ran into a problem. There appeared to be a square foundation from a basketball backstop in the far corner. This won't hamper the area for the potato tower but will need to be removed to expand the garden area.

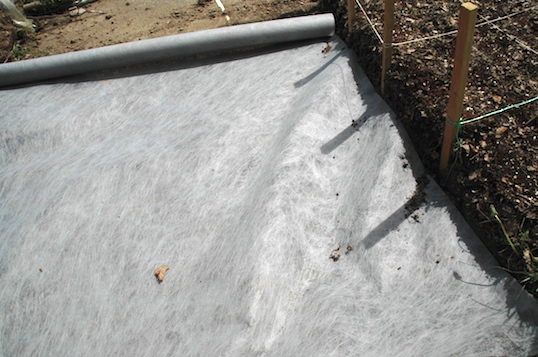
My plan was to dig down 2" (50mm), cover the area with weed control fabric. I happened to purchase some of the same fabric at a  garage sale last year for $3.00. The fabric is a 4' (1.2m) roll and I am not sure of its length, but I was confident there was enough for this project.

I went into my garage/dumping ground/workshop and found a piece of 2" (50mm) x 2"(50mm) lumber which actually measures 1.5" (38mm) square and I cut the length to 4' (1.2m).  I planned to use it to flatten the area to the same depth.

Once I was near the depth of the plot, I put the 2" x 2" x 4' wood in the work area.  Both sides were deep enough but the areas between needed to be adjusted. I worked the wood back and forth as if I were screeding concrete. Taking soil from the high areas and depositing in the low areas. I pivoted the wood and made an arc from the bottom towards the concrete foundation. I repeated the same action on the other side until the whole area was flat.

I then put the roll of weed barrier fabric in the flattened area. The roll was 4' wide and I rolled out 4' and cut the fabric.

The plan was to cover the fabric with pebbles. Pebbles will keep the fabric in place and won't allow weeds to grow.

The day I was working on this project there was a slight breeze and the fabric was lifted out of the area several times. To keep the fabric in place until I purchase the pebbles, I figured I needed to pin down the fabric with some kind of staple.

I brought two wire clothes hanger from the house. These wire hangers are fairly stiff and can be shaped with just a bit of force.  Without untwisting the hanger at its twisted joint, I made my first cut quite close to the twisted joint. I figured a 10" (25cm) length would be sufficient to make the staple. 10" lengths would give me close to 5" (125mm) for each leg of the staples to tap into the ground.
My out stretched hand from tip of my pinky to the tip of my thumb is approximately 10".

I used my hand as a measuring tool and cut the hanger wire into four pieces.

I took all four wires and estimating the center, bent the wires slightly. If they didn't look close to center I would have straightened them and tried again, but my estimate was close enough.

I finished bending each wire individually. If you are unable to bend the wire barehanded, by all means use the pliers.

I placed the staples on three corners of the fabric, tapping them into the ground with my heavy ball-peen hammer.

On the corner with the concrete foundation I used two staples.

I cut the other wire hanger to make four additional staples, one I used near the concrete foundation the other three I used to staple down the potato tower.

Time to fill the tower and plant the potatoes.

©Damyon T. Verbo - all rights reserved