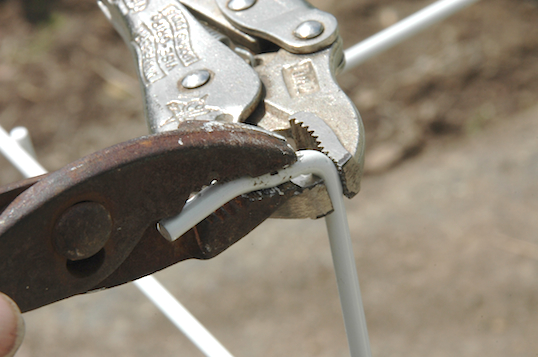
Four of the hanging wires were now straight.
Once the hanging wires were straight, I measured the distance between two hanging wires on one side. I started the mesh 1'(30.5cm) above the ground and placed the mesh between the 2x2s. Keeping the end of the tape measure on the bottom end of the 2x2, I placed the bottom of the mesh at 1'. That placed the straightened hanging wires at 20"(51cm) and 43-3/8"(110cm).
I marked the center of the 2x2 at 20" and 43-3/8". This is where to drill the two holes.
I went through my drill bits to measure the width of the hanging wire. It was just a bit smaller than the 1/4"(6mm) bit. The drill bit should be larger than the wire by at least 1/16"(1.5 - 2mm). Since I am not using a drill press to keep the hole straight and the wires are not completely straight you will need some slop in the holes. I chose a 5/16"(8mm) bit.
To keep from ruining my wood bit in the concrete, I placed the 2x2 on two other 2x2s raising it and giving me some space before I hit the concrete.
When all four holes were completed, I fit two of the hanging wired through the holes in one 2x2. Using my heavy hammer, I bent over the wires as flush with the side of the 2x2 while standing on the grid to keep it from moving as I hammered.
Both 2x2s were drilled and the hanging wires bent on both sides.
I measured the width of the wire mesh. I needed to make a cross member for the top of the trellis. I cut a 2x2 at that length to stiffen the top. The top rail could also have been cut at the width of the wire mesh plus the width of both 2x2s. Either way is OK. I chose to place the top rail inside the uprights.
At this point I needed gussets to join the upright 2x2s to the top cross member 2x2. (Gusset is a word borrowed from the tailor trade.) In this case it is a triangular piece of 1/4"(6mm) plywood measuring 8"(20cm) on each side.
Four gussets were cut and the frame fitted with the top member in place. I placed a framing square at the top corner to try and make it square. I also placed the box of exterior/deck screws nearby.
Whenever you nail or screw into a piece of wood it is important not to get too close to its end. I like to place the screw nearest the end of the length of wood at least 1-1/4"(31cm) in from the end and in the center of the wood, in this case 3/4"(25mm) from the edge. Placing the fastener too close to the end will split the wood.
I usually place all the screws/nails in one piece of wood first, as seen above. Do not get too close to the point of the gusset or that point will break off. Do not place all the fasteners in a straight line either. That will result in a split in the wood that won't hold any of the fasteners.
Here you can see the pattern of fasteners on the gusset. None of them are close to the ends of the lengths of the wood or the points of the triangles. The corner is square with the roofing square. Time to drive the fasteners home.
Flip over the trellis and repeat.
Trellis construction completed. Time to install at the plot.
I placed the trellis where I wanted it in the rear of the plot. That is rear with respect to the direction of the sun. I will place the shortest plants in the front and the tallest in the rear. I then drove one 6'(1.8m) concrete reinforcing rod into the soil on each side of the trellis.
I tried to keep the trellis plumb but that really isn't important.
I used the rebar wire to tie the trellis to the rebar. I tightened to the point I was afraid the wire would break. Finis.
I will construct at least one more of these, maybe two, when it is time to plant the tomatoes and peppers.
©Damyon T. Verbo - all rights reserved