Showing posts with label make. Show all posts

Tuesday, May 15, 2012

Built Another Potato Tower

Quite a bit of leaves remained after adding them to my square foot plot and filling up my potato tower.  I decided I like potatoes and another tower was in order.  I purchased a 50'/15m roll of 3'/.9m wide fencing. The fencing has 3"/76mm x 2"/50mm rectangular openings, as did the previous fencing used to build the first tower. This fencing differs in a few ways. The wire is a smaller gauge. It almosts feels soft, much easier to bend. The long side of the 2" x 3" openings changed orientation 90º so that the 3"/76mm dimension went from horizontal to vertical. 


I am guessing the gauge of the wire decreased to keep the price of the fencing low. I have no idea why the orientation rotated 90º. In any event, I constructed another tower using the same 64"/1.6m length of fencing. I cut the extra rectangle in order to attach both ends of the fencing to each other. I cut another wire coat hanger and made 5"/127mm staples to pin down the towers to the soil.


I changed the cloth used to surround the tower. I used all the remaining landscaping fabric on the first tower. I scrounged in my garage for something to use. I found a black single bed sheet in my rag pile. Bed sheets are saved to be reused before selling to the rag shop or entering the trash stream. (I am the son of parents that lived through the Great Depression. We save rags, aluminum, copper, screws, nails and lumber of sizable usable lengths. Our family has been recycling our whole lives. We are no strangers to the rag/scrap shop.)


I draped the sheet around the tower and overlapped where the ends of the fencing were joined. One edge of the sheet touched the ground and the remaining cloth flows over the top of the tower. I then placed 6"/15cm of leaves in the bottom of the tower. I didn't have any store bought potato seeds, so I opened my pantry to  scrounge for a suitable replacement.


I found a few sprouted Russet potatoes that were living under a large sweet white onion. They was easy to spot. The sprouts were a sickly white 6"/15cm and reaching around the Oso Sweet onion from both sides as though hugging the Oso in a lyonnaised sort of way, straining towards what little light entered the pantry.


I took the sprouting potatoes to the tower. This time instead of cutting the wire at the 6" level, I cut the sheet and bent the wire of one rectangle and squeezed in on potato leaving the 6" sprouts out in the sunlight. I did this again for the other potatoes. I expected to return to Lowe's to purchase more All Blue and Yukon Gold potato seeds to fill the rest of the tower. (I later discovered at Lowe's that the blue were dried and smelled bad and no gold remained. I purchased a bag of Russets.) The potatoes were planted Mon., May14.


©Damyon T. Verbo - all rights reserved


Sunday, May 13, 2012

Make Wire Supports For Your Garden

There are times when plants in your garden will need support. This post will show you how to make wire plant supports from readily available wire fencing.

The snow peas in my plot will soon need support. These supports were made for snow peas and can be used for other plants. The idea is that the plant will grew through the top of the support. The wire cube will provide the needed support.


There remained a piece of wire fencing from the no dig potato cage blogged about earlier. The rectangles in the fencing measure 2"(50mm) x 3"(76mm). The roll of fencing is 36"(91cm) wide.


Cut the fencing from one end so that there is 12"(38cm) of closed rectangles by the width of the roll, 36"(91cm).


Cut the wire midway into the next rectangle.


There will be 2"(50mm) of extra wire on each side.


Cut as many 3'(91cm) x 1'(38cm) pieces as supports needed.


A 12"(38cm) length of wood is needed to fold the wire sides. 


Source:onlinetoolsupply.com 
Use the wood block as a metal brake is used to bend sheet metal.


Bend both sides of the support that there are three sides of a cube measuring 12"(38cm) on each side.

Next, place the supports over each square planted with peas.

I turned the supports that I may easily reach in them from one side of the plot. With all the Norway Maples in my yard I need to clear out maple seeds constantly. Weeding will be possible, too.
 This corner support I turned 90º because it felt right.


I will update when the peas grow above the wire supports.


©Damyon T. Verbo - all rights reserved


Tuesday, May 1, 2012

Make A Trellis/Support

My plan this year is to grow small melons and cucumbers. In a square foot garden, I must grow them vertically. There is just not enough space for them to ramble around on the ground. The indeterminate tomatoes will need to be grown vertically for the same reason. Last year, for support I tied twine between concrete reinforcing bars driven into the ground. While it worked OK, I need something a bit more substantial this year.

  42" x 84" Mesh SheetGrip-Rite 150' x 5' Steel Remesh
Openings of at least 6"(15cm) are needed to allow my hands easy access to the fruit. I will be placing the melons into women's hose for support and the support will need to hold their weight.


In the distant past, I used concrete reinforcing mesh that is made on a 6" grid. Back then I had found abandoned scraps of the mesh in dumpsters at construction sites. I no longer work in the construction industry and don't have convenient access to scraps. It can be purchased at big box home improvement stores such as Lowe's, but I like free better. It is available in 150' (16m) rolls or sheets measuring 42"(1m) x 84"(2m)@$7.50/sheet. Being frugal, I began a search for such a material that would have no cost to me.

The slain beast with all eight legs in the air
While I was strolling in the garden area my local Lowe's, I mentioned my quest to a Lowe's employee. That person mentioned he was using a display item Lowe's routinely discarded as trash.  The employee told me were there might be one and I headed to the flooring department. Luckily, there was such a display on the floor in the rug area. This display was a corrugated box the size of a pallet vertically holding bound remnant carpets. To separate and keep the rugs standing vertically, there was a powder coated white wire mesh that hung over the top of the box.


I wasn't standing there long enough for the drops of my drool to darken the polished concrete floor when I was approached by another Lowe's employee who asked how I could be helped. I told the employee I wanted the wire mesh. Unfortunately, there were approximately nine remnants in the display. Without any hesitation, the employee removed the rugs and placed them on an almost empty shelf. The employee warned me that I might need to explain to someone about the mesh. If anyone questioned me on my way out of the store I was to have them call the flooring department. Once I had the mesh in my car, all I needed to do was to figure out how to make this mesh work as a trellis.


In my car with pencil and paper in hand, I designed a frame for the mesh. It consisted of a 2"(50mm) x 2"(50mm) wooden frame with plywood bracing in the top corners. I returned to Lowe's and purchased enough wood and screws to make two such frames. I hoped I would be able to acquire another wire mesh in the near future. If not, I bite the bullet and spend the $7.50 to purchase a sheet of concrete reinforcing wire mesh.


Tools - 
  1. Saw to cut both plywood and dimensional lumber
  2. Screwdriver - I used a portable drill with phillips head driver tip
  3. 5/16"(8mm) drill bit
  4. Locking pliers
  5. Pliers
  6. Framing square
  7. Pencil/marker
  8. Tape measure
  9. Heavy hammer
Materials - 
  1. 5 - 8'(2.4m) x 2"(50mm) x 2"(50mm) length of dimensional lumber
  2. 2'(61cm) x 2'(61cm) x 1/4"(6mm) exterior plywood
  3. 1-1/4"(32mm) exterior coated flat headed "deck" screws
  4. Heavy gauge wire mesh with 6"(15cm) x 6"(15cm) grid
First thing was to gather all the tools and materials needed and place them in my work area.

I chose two of the straightest 2 x 2s for the uprights and mark and be cut them at 6'(1.8m).

The free wire mesh has eight bits of wire that extend beyond the mesh originally used to hang the mesh over the corrugated box.  I decided to use four of those hanging wires to attach the mesh to my wooden frame. In order to do that I needed to straighten four of them.


Four of the hanging wires were now straight.


Once the hanging wires were straight, I measured the distance between two hanging wires on one side. I started the mesh 1'(30.5cm) above the ground and placed the mesh between the 2x2s. Keeping the end of the tape measure on the bottom end of the 2x2, I placed the bottom of the mesh at 1'. That placed the straightened hanging wires at 20"(51cm) and 43-3/8"(110cm). 


I marked the center of the 2x2 at 20" and 43-3/8". This is where to drill the two holes.

I went through my drill bits to measure the width of the hanging wire.  It was just a bit smaller than the 1/4"(6mm) bit. The drill bit should be larger than the wire by at least 1/16"(1.5 - 2mm). Since I am not using a drill press to keep the hole straight and the wires are not completely straight you will need some slop in the holes. I chose a 5/16"(8mm) bit.

To keep from ruining my wood bit in the concrete, I placed the 2x2 on two other 2x2s raising it and giving me some space before I hit the concrete.

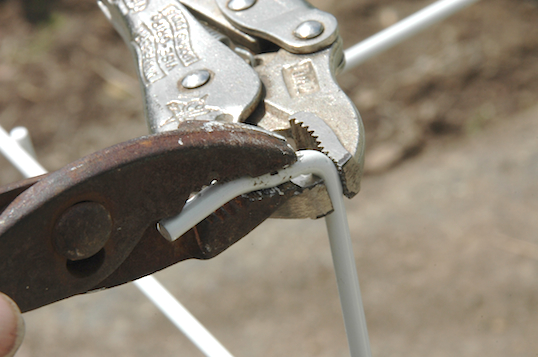
When all four holes were completed, I fit two of the hanging wired through the holes in one 2x2. Using my heavy hammer, I bent over the wires as flush with the side of the 2x2 while standing on the grid to keep it from moving as I hammered.

Both 2x2s were drilled and the hanging wires bent on both sides.

I measured the width of the wire mesh. I needed to make a cross member for the top of the trellis. I cut a 2x2 at that length to stiffen the top. The top rail could also have been cut at the width of the wire mesh plus the width of both 2x2s. Either way is OK. I chose to place the top rail inside the uprights.

At this point I needed gussets to join the upright 2x2s to the top cross member 2x2. (Gusset is a word borrowed from the tailor trade.) In this case it is a triangular piece of 1/4"(6mm) plywood measuring 8"(20cm) on each side.

Four gussets were cut and the frame fitted with the top member in place. I placed a framing square at the top corner to try and make it square. I also placed the box of exterior/deck screws nearby.

Whenever you nail or screw into a piece of wood it is important not to get too close to its end. I like to place the screw nearest the end of the length of wood at least 1-1/4"(31cm) in from the end and in the center of the wood, in this case 3/4"(25mm) from the edge. Placing the fastener too close to the end will split the wood.


I usually place all the screws/nails in one piece of wood first, as seen above. Do not get too close to the point of the gusset or that point will break off. Do not place all the fasteners in a straight line either. That will result in a split in the wood that won't hold any of the fasteners.

Here you can see the pattern of fasteners on the gusset. None of them are close to the ends of the lengths of the wood or the points of the triangles. The corner is square with the roofing square. Time to drive the fasteners home.

Flip over the trellis and repeat.

Trellis construction completed. Time to install at the plot.

I placed the trellis where I wanted it in the rear of the plot. That is rear with respect to the direction of the sun. I will place the shortest plants in the front and the tallest in the rear. I then drove one 6'(1.8m) concrete reinforcing rod into the soil on each side of the trellis.
I tried to keep the trellis plumb but that really isn't important.

I used the rebar wire to tie the trellis to the rebar. I tightened to the point I was afraid the wire would break. Finis.

I will construct at least one more of these, maybe two, when it is time to plant the tomatoes and peppers.

©Damyon T. Verbo - all rights reserved