Showing posts with label plastic mulch. Show all posts

Wednesday, April 16, 2014

Hades Releases Persephone

February 3, 2014 - 7.3"/185mm snow

The winter has been rather harsh here. A great deal of snow was shoveled. Much more than normal. Temperatures were low into the first month of spring. But as Zeus commands Hades to release Persephone each spring, the earth awakes.


I began the growing season late again this year as last. The reason was one of mixed cold temperatures and malaise. I missed the sowing of peas and onions for the second year in a row. I do so love freshly picked snow peas. Not to worry. The temperature rose above 68ºF/20ºC this week. I feel planting fever coming on.

First action I took in the square foot garden was sprinkling two tablespoons of my organic fertilizer on each square foot section of both raised beds. Second action was to mixing it into the first inch or so of planting medium.


What you see in the photograph are the two of the four drip irrigation tubes I use to water the raised beds along with the fertilizer atop the growing medium.

Fertilizer mixed into the growing medium.


Third action was to cover both raised beds with red plastic mulch.
The mulch will server many purposes.
  1. Warm the soil
  2. Keep out any unwanted seeds
  3. Retain moisture
  4. Reflect light up under the leaves.
Persephone is only upon the earth for a short time. Don't just stand there, do something in your garden. 


I am already thinking of that first tomato.

©Damyon T. Verbo - all rights reserved


Friday, October 25, 2013

For A Few Tomatoes More

Mortgage Lifter, 20 Oct 2013

Temperatures are dipping below the point for comfortably wearing short sleeve shirts outdoors. With that ripening has all but come to an end in the garden, but for a few tomatoes more.

Sweet 100, 20 Oct 2013

There are just two tomato plants remaining in the square foot raised beds. A Sweet 100 in near bed, and my prolific Mortgage Lifter in the far bed.

Quite a few pink and plenty of green tomatoes still cling to the vines. There is a chance I will get some ripe tomatoes before temperatures fall below freezing.

Once the tomatoes are all gone, I will don a poncho, cut down the vines, remove the trellises and cover the growing medium with fresh red plastic. To keep out unwanted seeds. If I get ambitious, I just might create a greenhouse over at least one bed with clear plastic and black plastic tubing. When and if I do, I'll plant lettuce seeds. Bunching onions would be nice, too. For a few 2013 harvests more.

©Damyon T. Verbo - all rights reserved


Monday, May 13, 2013

Sprout Thinning and Sucker Pinching

While I was installing the drip irrigation system in the raised beds, I did a bit of maintenance.


I transplanted some overcrowded lettuce from one slit to a slit that had no sprouting lettuce.


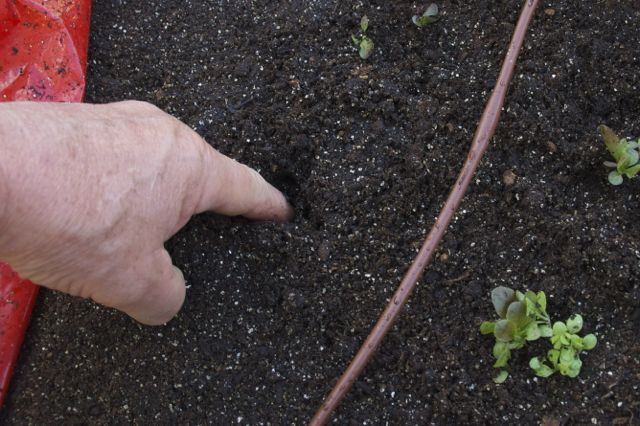
I marked the unproductive slits by poking my finger through the slit into the growing medium. The plastic mulch was then pulled back revealing the hole.


A sprout or two was taken from one of the overcrowded slits and place into the poked holes.


The medium was then firmed around the newly transplanted sprouts. 


The plastic mulch was replaced being sure to align the slits with the sprouts. The slits were enlarged to allow more room for sprout growth.


The tomato plants have already added green mass over the last week or so. 


Along with regular growth there were many suckers that needed to be pinched off the vines.


As you can see there were quite a bit to remove. By removing the suckers the plant can use its strength to grow a strong central stem and additional roots. A strong stem is needed to support the soon to be tall vine. More roots will benefit the plant with a stronger base. They will also have the ability to reach deep below the sun dried surface where moisture is present. 

Thinned and pinched the garden is looking good.


Friday, May 10, 2013

Drip Watering System for Lazy Vegetable Gardening

I am, what I call, a lazy gardener. I don't mind working hard in the spring but when it gets hot, I get lazy. Therefore, I try to do as much work as I am able in the spring to sit back and enjoy the garden through the summer.

In the mail this week, I received the drip irrigation system for my raised beds. Over the past 7-8 years I have been using a 1/2"/ 13mm soaker hose cut to the needed length and joined together with regular garden hose using plastic fittings. However, last year the 1/2"/ 13mm fittings I need were no longer available on the market. Neither in the brick and mortar stores or on the internet. All the available fittings were 5/8"/ 16mm. My old system was not repairable, it was finished, kaput, done. I needed to move on to a new system.

 
From Lowe's, I purchased a Mr. Landscaper Drip Irrigation Vegetable Garden Kit. This is not a item my local Lowe's stocks. I had to make the purchase online at Lowes.com. Over a period of two weeks I experienced problems completing the purchase. Lowe's system just wouldn't complete the sale. I had to call their customer service number listed on the website. To make a long story short, the kit was purchased in Texas and sent via UPS. Way to go Lowe's.

The above tubing included in the kit is 1/4"/6mm inside diameter with one 1/2gal/1.9L per hour/ emitter spaced every 12"/30cm along the hose. This works perfectly with the square foot garden method I am using for these raised beds. How does it work perfectly, you ask? Let me explain.


Each raised bed in divided into 16 equal 1'/ 30cm squares.

                                       
Four 4' lengths of emitter tubing, each with four emitters spaced 12" apart are placed on the bed 12" apart. Thereby having one emitter for each sq ft space. On average over the growing season, each sq ft space will need 1gal of water per week. By isolating the water supply to this drip system for two hours per week, the plants will obtain their needed gal/wk.

I started by installing the emitter tubing, opposite of the manufacturer's installation instructions. I cut the end of the tube 6"/15cm from the first emitter. Starting at one side of the raised bed this measurement placed all the emitters in the center of each delineated sq ft area.


Since I had the plastic mulch already atop the raised bed, I needed to thread the tubing under the plastic. To keep out any foreign matter from the hose, which might stop the water flow, I placed a plug into the leading end of the tube.
If you look closely you can see the leading end on the left side of the photograph as I feed the tube under the plastic. If the end wasn't plugged there would undoubtable be some foreign matter in the tube.

Above you can see the tubing exiting at the next plant. Continue feeding the tubing through until you reach the other side of the bed.


I was able to uncover the surface of the bed to place this row of tubing rather than fishing it under the plastic. Much easier doing it that way.


The next step was to pierce the 1/2"/13mm supply tube. 

Insert a connector and push the end of the emitter tubing onto the connector. Do the same for all four of the emitter tubings.

You will notice in the above photograph, the supply tubing tends to keep its curved shape from all the time it spent coiled in the packaging. That needed to be addressed, next.

I found the above items in my garage. Plastic pipe strapping, hex washer headed sheet metal screws and a magnetic socket to drive the screws. I had both phillips headed and these hex headed screws. I chose the hex screws because I knew the screws would rust outdoors even thought they were coated. The hex headed screws would be easier to remove once the rust got to the screws.

I cut the strap so there were three holes to each length. I chose the length after conforming the strap over the black supply line. 

I placed one strap/clamp on each end of the raised bed frame which left some curve in the supply line near the center of the frame.


To take out that hump in the supply line I added another strap/clamp.


Some supply line needs to extent past the raised bed frame to use the double over clamp you see on the red plastic to the left of the pepper plant above. I am leaving the end of the supply line open until it is connected to the water supply. Just before installing the double over clamp on the end of the line water needs to be flushed through the tube to get out any foreign matter that might clog the tube.

Everything fit perfectly and I have more emitter tubing to extend the drip system to other parts of my garden. With the drip system, the plastic mulch and the raised beds, I am almost ready to a lazy season of vegetable gardening.



Tuesday, May 7, 2013

Direct Planted Vegetable Seeds Sprouting

Vegetable seeds were directly planted into the growing medium on 20 April, 2013. These photographs were captured on 4 May, 2013, two weeks after direct planting.
  
In the plastic boxes were planted ... 

 
I don't remember exactly what I planted in those boxes. I didn't write any notes about these boxes as I did for the raised beds.

Between the open packets of seeds and the visual clues, I believe I planted bunching onions, beets, swiss chard and radishes.

In raised bed #2 the lettuce was peeking out of the slits I cut in the red plastic mulch.

The started tomato plants are showing evidence of growth. I have already been thinking about supports/trellis for the tomatoes and cucumbers to be planted in early June.

Carrots are peeking through the plastic mulch.

Close up of some lettuce.
Once the secondary leaves are opened I will begin to thin down to a few plants per slit. A little later the space will go to the strongest single plant.

I purchased two more varieties of tomato plants - Super Sweet 100, a grape tomato, and Cherokee Purple, an heirloom. I planted them in raised bed #1.

I try to keep the producer's plant ID with each plant.


I visit the home center often to look for new arrivals of tomatoes and peppers. If they ever arrive, I will round out my tomato purchases with a Rutgers variety and a Marglobe variety.

The Rutgers is suppose to be close to the taste of Jersey tomatoes, a familiar flavor from my childhood. Jerseys were tomatoes grown in New Jersey when Campbell's Soup had a tomato soup canning facility in Camden, NJ.

Marglobe I will plant for its abundance of fruit production. The grower touts 50lbs/22.7kg of Marglobes per plant per season. I will need to keep up with watering to fill 50lbs of tomatoes.

I can hardly wait to bite into one of these beauties. Teeth snapping through the red skin, juice popping into the air and seeds dribbling down my chin and onto the front of my shirt. I'll swoon from the odor of vine ripened tomato as the acid cuts into my sun parched lips. Is there anything better? Well, maybe there is. This has got to be a really close second, right?

Good gardening!

©Damyon T. Verbo - all rights reserved


Wednesday, May 1, 2013

Late First Planting New Square Foot Raised Beds

Here in the Philadelphia area, it is customary to plant peas and onions on St. Patrick's Day, 17 March. My two new raised beds were still in the planning stage on that date. I finished constructing, mixing the planting medium and filling the beds 15 April. Too late to plant peas and onions. Not to late for tender plants if they are protected from frost.

Lowe's had these Bonnie tomato plants on sale 20 April. Besides being on sale, they were tomato varieties I wanted to plant. One thing about Bonnie plants I have learned over the last few years is that the variety you want may not be available if you wait to make your purchase later in the season. For those two reasons I purchased the following four tomato plants.


Red Beefsteak-My wife's request
Mortgage Lifter - A huge tomato with great taste
Mr. Stripey - A buttery sandwich size tomato
Tamy G Hybrid Grape Tomato- I have never grown it but will give it a try


In the past I have failed to get the newly purchased plants into the ground before they suffered damage. I tend to procrastinate. Therefore, as soon as I got these plants home from Lowe's, I prepared the grid and started planting the tomatoes.


Each tomato plant got its own one foot square. I cut an X in the center of a square. I folded back each triangular flap to form a square. I then dug down to near the bottom of the raised bed, putting the displaced growing medium on the plastic mulch near the hole.


Using my thumbnail I removed branches about 6"/ 15cm up from the bottom of the stem. Why do this? Tomatoes sprout roots along the buried stem. The extra roots add support for the fruit. Plus, the tomato will access moisture deep in the soil that doesn't dry out as readily as soil near the surface.


Next I removed the label and pot from the growing medium and tomato roots.


If the roots are dense and growing in a circular pattern, 


they must be loosened, straightened, freed from that circular pattern. If you don't, the roots will continue to grow in that same circular pattern and not stretch out for support and access to more moisture.


Place the plant into the hole, roots first, of course. The bottom branches of the plant should not touch the plastic mulch when the plant is standing straight. If they do, remove those lower branches.


Return all of the displaced growing medium into the hole around the plant and firm it down a bit. Move on to the next plant and repeat. 

Besides the tender tomatoes I also planted seeds of several varieties of lettuce and several varieties of carrots in the raised bed.


The four squares on the bottom row are each planted with four lettuce each. The two squares on the left side of the next row each has 16 carrots spaced equally.

For a continued supply of lettuce, I will plant more every two weeks until the temperature gets hot when the lettuce tends to bolt to seed. I reserved some squares for peppers and other tender plants to be added at a later date.


©Damyon T. Verbo - all rights reserved